Monday, November 25, 2013

Quarter cicle skirt and apron

My three-year old daughter has decided she loves wearing skirts. Since this is a new thing, she only actually had one skirt, a full circle-skirt I made for her last year. A few nights ago, I suddenly got the urge sew up a quick and pretty project, and decided another circle skirt was in order.

After googeling a little, I found this page that explains the math needed to calculate the fabric for the skirt, and I decided to try a quarter-circle skirt with a waistband made from ribbing this time. 

I found a little duvet cover in my fabric stash and loved the pink little flowers. Turns out I had already made an apron from the same duvet cover, and the other day when Princess K was getting dressed, she found it in her little wardrobe and decide to wear them both together. I wish I'd gotten a picture!


Sunday, November 24, 2013

I visited a local tailor for the first time in years

I think the last time I went to have clothes made by a Guinean tailor was back in 2009. I wasn't very happy with the results back then, thoug. A very beautiful print that totally depended on cutting it the right way was botched by careless cutting. After that, I started sewing for myself (not because of that, however), and since learning to make my own clothes became a hobby, I didn't much see a need to send any more fabric out to be cut and sewn by others.

That was until I realised how much I can learn by studying West African techniques up close. So I really wanted to find a tailor that did good work. A few weeks ago, I stopped by an aquaintance who owns a little clothes shop near where I live. I asked where to buy bias tape, and she walked me over to this tailor working close to her booth. I got my bias tape, and much more importantly, I got to see some really nice work of embellishing African-style clothes with bias tape. I see women wear this stuff every day, but never, ever owned a garment made like that.

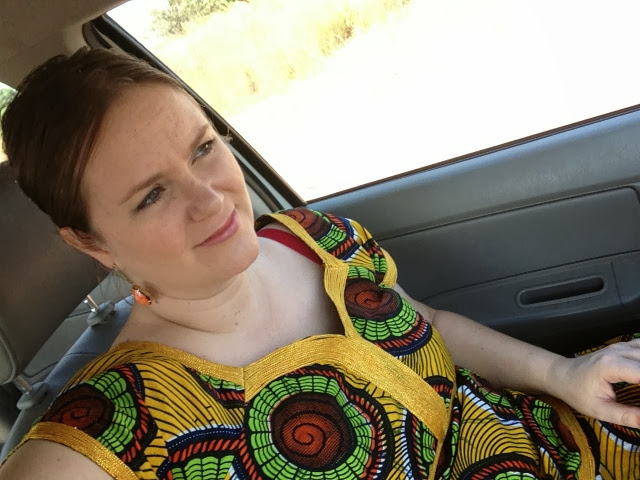
So I decided to ask the tailor to make me some clothes. I found this "pano" (I think they call it "pagne" in French) which is a wax print type fabric in the typical vibrant colors that women love to wear here. It had been sitting in my stash for about 10 months, and I was a little reluctant to use it, because the print is so big. You do NOT want to end up with huge circles in all the wrong places, right?

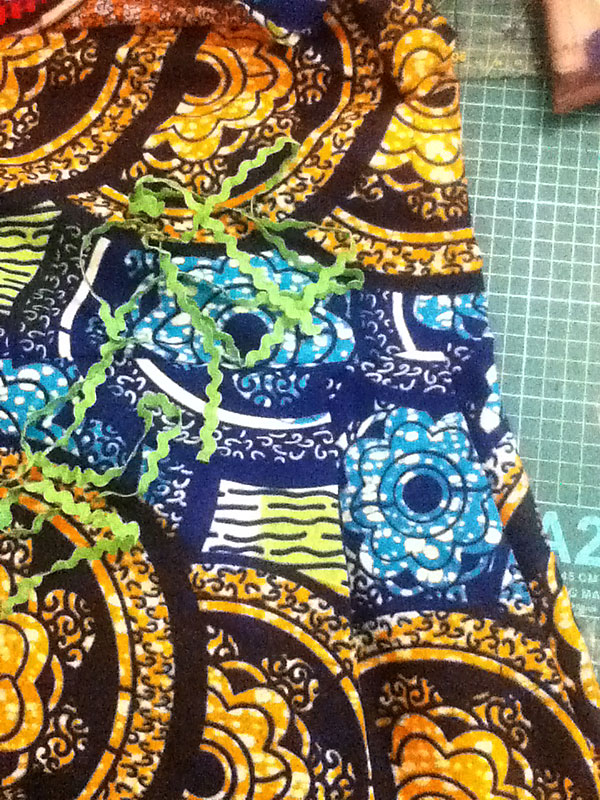
So I asked him to use some of his fancy embellishing techniques, and was very curious to see how it would end up.  When I was walking by his shop a few days ago, he had a young boy (presumably his apprentice) sewing on my fabric and I strolled up to see. He was fastening the golden rope  around all the edges by sewing it meticulously to the fabric, thread by thread, on his treadle machine. It was serious work, and I was really impressed. 

I went to pick up the garment yesterday, very curious about the result. I knew it would probably look nice, but would it fit me? He had taken my measurements, but that was no guarantee for success in the past, so I was trying to keep my excitement in check.

When I paid him, he told me to take it home and try on there, and if I needed any alterations done, he'd do them. I took it home and tried it on, and really, it was not bad at all, fit-wise. If i didn't know better, (read: If I didn't know how to sew myself and trained my eye to see fit issues others might not notice) I wouldn't have seen any problems with it at all. And since I was supposed to go to a party the day after, I decided to go ahead and do the alterations myself, so I could wear my new outfit the next day. I widened side seams of the blouse a little, and finished the seam allowances with zig zag stitches. The treadle machines only have a straight stitch, so it is rare to see any seams finished around here. To my disappointment, there was no evidence that my dress had seen the bottom of a pressing iron during construction. Therefore, the darts were not as flat as they could've been. Even though I tried my best (with my home made tailor's ham!) to press them flat, it was not to be.I could almost hear the Pressinatrix lamenting the lack of pressing as I was sweating over my iron, trying to smoothe out the creases.

I also cut off the top 3 inches of the wrap-around skirt so I wouldn't have to wear it all the way up to my waist. I sewed some side and back darts too, to make it sit a little nicer around my hips. The whole process took me a couple of hours, but I figured it was worth it so I could get to wear the dress at the party today. My friends all thought it looked nice, and I am very happy with it too.


Here I am posing with my former neihgbour who had also had her clothes made by a local tailor. Not the same one, but she was very happy with what he'd done.


Saturday, November 23, 2013

Sweat pants from Ottobre Kids

I made these several months ago and finally got around to blogging them! My son really likes to wear these pants, as they are sooo soft and comfy, but most days are way to hot for them. We do get some cooler days here, though, when it rains heavily or during the "cold season" of mid-November through January, so I am foreseeing a lot of use for these.


The pattern is from Ottobre kids 4/2011, and the design is # 25. I cut it in size 104, and they were a little on the long side when he first put them on (at 3 years and a month), but I know he will be growing into them soon enough.


The fabric is all imported (by me - in my suitcase), the green sweat shirt fabric is from Stoff og Stil, a fabric chain store in Norway, and the yellow is probably from there too. I used FOE and a three stitch zig zag stitch to bind the pockets, and loved how much time I saved doing that instead of cutting the binding from fabric. The pocket lining is cut from a promotional t-shirt my hubby got from the company that provides us with internet service. We're not really happy about the service, and he never felt like wearing it and promote them, so I decided to put it to better use here.

If you wonder if I used my serger for this, the answer is no. I just bought a serger too, but it hasn't arrived yet. It's in a container somewhere in the USA right now, and will be arriving here in well over a month. So for now, I'm using a narrow zig zag for all my knits. It works ok, but it is not awesome. There's a reason I wanted a serger, and I'm really looking forward to start using it!

 Here's a true action shot from a day he and his sister got to accompany their daddy out to the rice field where daddy is working!


Thursday, November 21, 2013

Embracing "My Africa"

As a mostly self-taught home sewist, I find most of my inspiration in sewing blogs written by people that live in a very different world than I. They live in a world where you can order all the fabric and notions they need online, and the package actually makes it all the way to their address for delivery. Even better, they can visit a brick-and-mortar establishment and actually get to fondle dozens of fabrics before choosing which to buy, between the many different styles and prints available.

The reality here in West Africa is very different. "Fabric stores" are unlit stalls in the market that offer at most, 30 different prints, all loud and colorful, usually with very large patterns. Most of the fabric is medium to heavy-weight cotton of varying quality. There is no silk, chiffon, lawn or velour, and there are definitely no knits. Notions are sold in even smaller stalls, and you get to choose between a few different colors of bias tape, ric rack and some very fancy trim. That's about it. 

Some days, I tend to look around and feel a little discouraged. I see people sewing up such awesome creations that they share on their blogs, and feel a little left out for not having access to the same resources.

But I have decided it's time to embrace where I am and instead of griping about the down sides, celebrate the up sides. While working with African Wax prints require some pretty serious pattern matching and planning before cutting in order to avoid awkward placement of huge colorful design elements, it is a fun, and certainly different kind of experience. And in terms of blogging, I have fodder for blogs that the majority of other sewing bloggers will never have. So why not celebrate it?

In that spirit, I have embarked on a new sewing adventure. Around here, women wear the most elaborately embellished dresses. Many of them wear clothes I'd deem worthy of wedding attire for a simple trip to the market. The local tailors use a lot of ric rac and bias tape to embellish their work, and, while I've used bias tape before, it has always been in a functional, rather than decorational way. Finishing sleeve openings? Check. Binding napkins? Check. Actually using bias tape as a main design element? No check.


So I decided to do a little test run as I did my (hopefully) wearable muslin for Butterick 5917. The fabric is a very red, and quite demanding cotton print that has been sitting in my stash for well over two years. It is not ideal for this dress, which I ideally see in a much lighter fabric and preferably in a solid color, or with a small print.   But hey? I'm celebrating the uniqueness of being a western sewist in a West African reality, right?

The dress is almost finished now, and hopefully I'll get around to blogging it in a few days or weeks. Unless it is a total fashion disaster, in which case I will spare you the experience of seeing it.


Tuesday, November 19, 2013

Metamorphosis

Once upon a time, it must've been over a year ago, I started prepping the pattern pieces of McCall's 6554.


I can not remember why I decided not to make it according to the pattern. Looking at the illustration today, it looks like a cute dress. Maybe I was just tired of making dresses I rarely wear and wanted a more versatile  tunic to wear over jeans? So when I started on the muslin last year,I nixed the skirt part, and the the dress became a tunic with a much narrower skirt.  I did a lot of changes on the muslin, and I really liked the fit I got, so I decided then that I would use it again some time later.

I finally did. This time, I made further changes to the neckline to avoid some gaping issues, and I cut the skirt a little smaller. I sewed it up in a pretty African wax print (no-brand) that I got at the local market where I live.

Around here, respectable ladies cover their shoulders. I'm not really a big fan of sleeves in this heat, so I opted for a cap sleeve, and simply used the pattern from the cap sleeve on the Washi dress. Boy, has that little pattern piece gotten a lot of use! This is not the first time it has been Frankinpatterned with other patterns.


The bodice is fully lined, and there's an (almost) invisible zipper in the back.(I haven't seen any invisible zippers for sale here, so I had to use a white one from my stash) I finally got to try out my new invisible zipper foot, yay!  And did you notice how the pattern lines up pretty awesomely in the back?


My hubby took these pictures early on a Sunday morning, and sadly, there was not enough light to get a crisp picture. But you get the idea, right?

The skirt is a simple wrap-around with side and back darts. It didn't make it into the pictures because we were in a hurry and there wasn't enough space for hubby to walk backwards enough for all of me to fit in the viewfinder. I haven't worn a wrap-around in years, since they have a scary tendency to fall off, but I did find that with the darts, the skirt stays in place all day. 

 With the new skirt and all the changes I made in the bodice and sleeve of this top, I do feel like I'm entitled to call the pattern my own. Is that allowed?

..

Saturday, September 7, 2013

The bag I gave to Rose


About a year ago, I decided to rip apart a well-worn over-the-shoulder bag my mother got me in Italy. I loved the shape of it, but the fabric was worn out and I figured I could easily replicate it. I was right. The basic pattern is only two pieces, but I adapted it to my personal gusto and added some pockets on the inside, as well as a little loop to hang a key chain on.

I hate having to rummage through a huge purse to find the ever-elusive key chain. Now I don't. I just zip open the bag and reach in... and the keys are hanging safely in the loop I made out of a ribbon with a snap button. 

I also added a zippered pocket  for coins and other little things and a big open pocket in the lining. 

Then I took my bag with me to a ladies' function. And I got stares and "aaaws" all around. So I quickly realized there was a potential for mass production here. Except I have only made one more. For a friend's birthday. She chose the fabric out of three different ones I bought in Gambia and Norway, and she asked for the loop to be another 20 cms longer. It is a 120 cms long! She loved the bag and so did I.


Thursday, March 7, 2013

Oliver & S Ruffle Halter Top


So I downloaded this pattern months ago from Oliver & S, but it has been collecting dust for quite a while. Until it started calling for me the other day.

I had just made a peasant top for myself using this red/white gingham fabric I got in Gambia last fall, and there was a lot left over. So my mind wandered to the Ruffle Halter Top.

 (Image from Oliver & S)

I figured a mother and daughter should have a matching shirt, right?  So I started cutting a size S. The ruffles are cut on the bias and then attatched to a flat front piece. The pattern tells you to sew the wrong side of the ruffles to the front piece right side. That was a little unexpected for me, as it leaves the raw edge of the ruffle exposed above the seam. But I zigzagged it down as the instructions suggest, and I really don't think I'll think much about it later. With the top being so darn cute, and the wearer even more so, it just won't be an issue.


I also didn't quite understand what it means when they say to "top stitch" the bottom edge of the ruffles. It doesn't say to hem them, just to "top stitch". I never before saw instructions to top stitch something that isn't already stitched together with another piece of fabric. Since they are bias cut and won't fray much, I didn't do a regular hem, but ended up just folding the raw edge under once on the wrong side about 1/4" and stitching it down.  

And the final result? Cute - ness!

Tuesday, February 19, 2013

Work in Progress

It would seem that I have had nothing to blog about for a while. The problem for me seems to be the jump from having a garment to blog about to getting some decent pictures of it to go with the text... I have several finished garments I would love to share, but alas... no pictures yet!


So here is a little snapshot from the ipod of the project I a finishing up today. It is pretty much done, but since I haven't had any generator power for weeks, I haven't been able to press anything so it is so not going to be worn until that is in place!

It is a skirt made in an African wax print I bought at the local market. I saw this lady in church the other day who wore a skirt I really liked. It was fitted from the waist down to below the knees, and then there was this asymetrically pleated peplum on the bottom. This style is quite common here, and I've never had any idea how to make it. After thinking about it all day, I decided to try and replicate it. I still need to attatch some ric rac and tack down the facings, and of course... press everything, but it is looking really nice!


Thursday, January 24, 2013

Finished: Adorable little cami for Princess K


So there as been very little blogging lately. One reason was I didn't have power for my iron until today, and I wanted to be able to press stuff before finishing and then telling about it.  I have been reading up on the importance of good pressing on several other blogs lately, and decided it was better to have a few UFOs sitting around half-finished, waiting for power to plug in the iron, than to sew on without pressing, and ending up with a finished product I wasn't all that excited about.


But here we go... When we finally received our Christmas package in the mail (about two weeks into January) there were four issues of Ottobre in it! I excitedly sat down to browse through all of them within minutes of opening the package, and decided that this cami would be the first project I'd make from them. It  is featured in Ottobre 6/2012 and is called the "Lumikello" Cami.  I wanted to make it in a very airy fabric so that Princess K would wear it even in the hottest of the African dry and hot season months of April through June. So I went with this yellow cotton batiste, really purchased thinking I'd using for lining other stuff, but hey... you take what you have, right?


I embellished it with lace I got from my mom. It's pretty, but not as gorgeous as this awesome vintage lace my mom has gathering dust in her stash at home, next time I go, I'll ask if I can take it... It would have been so adorable on this cami.


Since the fabric is so sheer, I did French seams down the sides, which turned out nice. The shorts are made from the now tried and true "Kid pants" pattern by MADE.  


Linking up to


Tuesday, January 1, 2013

The very long process of my first pants!

Consider this my second muslin of my first pants. I STILL haven't actually sewed up the pants in a decent fabric. But I'm getting there, inch by inch.

I have been sewing for about a year and a half now,  and never really attempted pants before. I figured it would be harder than dresses or tops, since you have to figure in the zipper and pockets, and of course, it has to fit around the curves of the hips... many challenges, there.


Then I came across "The Consulting Dressmaker". This is a lovely lady by the name of Steph who offers the service of creating a pants block from your personal measurements and helping you tweak it until it fits perfectly. Well, I went for it, and Steph did not disappoint. It took me about two months to finish tweaking the block, because I kept getting distracted by other projects, but she was very patient and helped me get there.  Steph, by the way, is the creator of Cake Patterns. I love the Tiramisu dress pattern... don't have it yet, but maybe soon!!


When I went to Gambia this fall, I purchased some very nice pinstriped black wool suiting fabric which I hope to use for my final pants based on this block, but since I only have one shot at getting it right after cutting it out, I figured I'd better muslin first. So first, I made a pair of shorts, in an absolutely terrible pants fabric from the local market. They turned out ok, but I realized that the Juniper pattern (by Colette Patterns) I used, is really, really wid in the legs. I thought my legs are wide enough by themselves, they don't need that much extra with, so for the second, full-lenght  muslin, I went for a flared leg, grading in from hip to knee and back out from knee to the floor. I used the Juniper pattern that I adapted to fit my pants block, and then I shaved off both inseam and side seam in an X shape to get the trumpet shape. I can see now that I can shave off even more, and leave the bottom of the legs somewhat less wide. For this muslin, I used a white sheet that I got at the flea market. You can tell it has a terrible drape and is absolutely not suited for garments at all. You might also be able to tell that my pressing leaves much to be desired. *averts eyes in shame*


The knit top I'm wearing in these pictures is sewn from Simplicty 1916, view E. This is the second time I make that top, the first one was a solid blue sleeveless one that got a lot a wear, but now has a bleach stain. Blah! This one is nice because it has sleeves, but looks its best right after coming off the clothes line. With every hour of wear, the front seam droops more and more and looks less and less flattering. I think  the fabric is at fault, as I don't have this issue with the other top I made from the same pattern.

Colette Parfait Dress


Happy New Year!


On this first day of the new year, I thought it was about time to blog some of the projects I've been playing with in the last months. First out, the Colette Parfait Dress.  I have drooled at the Colette website for a long time, but since I live far away from a mail box, it was never an option to buy any of their patterns. Before. Now that they started offering their patterns as pdf downloads, even we remote village dwellers with an internet connection get to partake of their lovely patterns!

Before choosing the Parfait, I browsed all their dress patterns, and googled each one to see how other people looked in their creations of each one. I especially looked for a dress that would look nice on a larger body like mine. The one that I found most matching those criteria, was this one. The other dresses are lovely too, but do seem to fit nicer on smaller size women. (If you can prove me wrong there, please post a link!!! I would love to be wrong this time!)

I cut this in size 18, but later regretted not cutting the bodice in 16. I had to tweak it a lot, and it would have been much less work just to start with the smaller size. I had even made a muslin, but since I didn't include the straps in it, it was really hard to see how the fit would end up, and I regret skipping that step in retrospect. I even had the pieces cut out, but felt too lazy to do all the sewing...

The fabric I chose was an "American cotton" I got on my crazy cheap shopping spree in Mexico last spring. I think it was something like the equivalent of 3 USD per meter, and sewing with it was a delight. It is a woven, but must have something elastic in it, because it has a slight stretch and drapes beautifully. The slight stretchiness is perfect for me, it makes any dress more comfy and easier to fit.  

I didn't make any significant design changes, but I felt that the V in the bodice front showed a little too much cleavage for my taste, so I sewed the facing to the front bodice at a quarter inch seam allowance instead of the standard 5/8", lifting the bottom center 3/8".  That later caused me to have to redo the whole facing application (the curve just wasn't looking very nice), which I had already understitched, and if you've ever ripped any seams sewed in interfaced material, you know what a pain in the neck that was. 

I also substituted the invisible zipper with a lapped regular zipper. I don't have an invisible zipper foot, which is the reason for that choice. I love how the patterns calls for a side zipper instead of the dreaded back ones. I just hate having to ask for help to get dressed! 


As you can see, the dress fits like a glove in the back. That made me a very happy camper. I hate things that bulge and pucker in the curve of my back, but this fit perfectly right off the bat. (After shaving off 2 inches on each side seam).  

I didn't attach the pockets right away, and wore the dress to church this Sunday without them. It looks great without them in this kind of fabric. Since I had already prepared them, though, I decided to go ahead and attach them, but they don't show that much at all, the fabric being so busy and all. But I figure that a mother of 2,5 year old twins can never get enough garments with pockets...