Thursday, January 24, 2013

Finished: Adorable little cami for Princess K


So there as been very little blogging lately. One reason was I didn't have power for my iron until today, and I wanted to be able to press stuff before finishing and then telling about it.  I have been reading up on the importance of good pressing on several other blogs lately, and decided it was better to have a few UFOs sitting around half-finished, waiting for power to plug in the iron, than to sew on without pressing, and ending up with a finished product I wasn't all that excited about.


But here we go... When we finally received our Christmas package in the mail (about two weeks into January) there were four issues of Ottobre in it! I excitedly sat down to browse through all of them within minutes of opening the package, and decided that this cami would be the first project I'd make from them. It  is featured in Ottobre 6/2012 and is called the "Lumikello" Cami.  I wanted to make it in a very airy fabric so that Princess K would wear it even in the hottest of the African dry and hot season months of April through June. So I went with this yellow cotton batiste, really purchased thinking I'd using for lining other stuff, but hey... you take what you have, right?


I embellished it with lace I got from my mom. It's pretty, but not as gorgeous as this awesome vintage lace my mom has gathering dust in her stash at home, next time I go, I'll ask if I can take it... It would have been so adorable on this cami.


Since the fabric is so sheer, I did French seams down the sides, which turned out nice. The shorts are made from the now tried and true "Kid pants" pattern by MADE.  


Linking up to


Tuesday, January 1, 2013

The very long process of my first pants!

Consider this my second muslin of my first pants. I STILL haven't actually sewed up the pants in a decent fabric. But I'm getting there, inch by inch.

I have been sewing for about a year and a half now,  and never really attempted pants before. I figured it would be harder than dresses or tops, since you have to figure in the zipper and pockets, and of course, it has to fit around the curves of the hips... many challenges, there.


Then I came across "The Consulting Dressmaker". This is a lovely lady by the name of Steph who offers the service of creating a pants block from your personal measurements and helping you tweak it until it fits perfectly. Well, I went for it, and Steph did not disappoint. It took me about two months to finish tweaking the block, because I kept getting distracted by other projects, but she was very patient and helped me get there.  Steph, by the way, is the creator of Cake Patterns. I love the Tiramisu dress pattern... don't have it yet, but maybe soon!!


When I went to Gambia this fall, I purchased some very nice pinstriped black wool suiting fabric which I hope to use for my final pants based on this block, but since I only have one shot at getting it right after cutting it out, I figured I'd better muslin first. So first, I made a pair of shorts, in an absolutely terrible pants fabric from the local market. They turned out ok, but I realized that the Juniper pattern (by Colette Patterns) I used, is really, really wid in the legs. I thought my legs are wide enough by themselves, they don't need that much extra with, so for the second, full-lenght  muslin, I went for a flared leg, grading in from hip to knee and back out from knee to the floor. I used the Juniper pattern that I adapted to fit my pants block, and then I shaved off both inseam and side seam in an X shape to get the trumpet shape. I can see now that I can shave off even more, and leave the bottom of the legs somewhat less wide. For this muslin, I used a white sheet that I got at the flea market. You can tell it has a terrible drape and is absolutely not suited for garments at all. You might also be able to tell that my pressing leaves much to be desired. *averts eyes in shame*


The knit top I'm wearing in these pictures is sewn from Simplicty 1916, view E. This is the second time I make that top, the first one was a solid blue sleeveless one that got a lot a wear, but now has a bleach stain. Blah! This one is nice because it has sleeves, but looks its best right after coming off the clothes line. With every hour of wear, the front seam droops more and more and looks less and less flattering. I think  the fabric is at fault, as I don't have this issue with the other top I made from the same pattern.

Colette Parfait Dress


Happy New Year!


On this first day of the new year, I thought it was about time to blog some of the projects I've been playing with in the last months. First out, the Colette Parfait Dress.  I have drooled at the Colette website for a long time, but since I live far away from a mail box, it was never an option to buy any of their patterns. Before. Now that they started offering their patterns as pdf downloads, even we remote village dwellers with an internet connection get to partake of their lovely patterns!

Before choosing the Parfait, I browsed all their dress patterns, and googled each one to see how other people looked in their creations of each one. I especially looked for a dress that would look nice on a larger body like mine. The one that I found most matching those criteria, was this one. The other dresses are lovely too, but do seem to fit nicer on smaller size women. (If you can prove me wrong there, please post a link!!! I would love to be wrong this time!)

I cut this in size 18, but later regretted not cutting the bodice in 16. I had to tweak it a lot, and it would have been much less work just to start with the smaller size. I had even made a muslin, but since I didn't include the straps in it, it was really hard to see how the fit would end up, and I regret skipping that step in retrospect. I even had the pieces cut out, but felt too lazy to do all the sewing...

The fabric I chose was an "American cotton" I got on my crazy cheap shopping spree in Mexico last spring. I think it was something like the equivalent of 3 USD per meter, and sewing with it was a delight. It is a woven, but must have something elastic in it, because it has a slight stretch and drapes beautifully. The slight stretchiness is perfect for me, it makes any dress more comfy and easier to fit.  

I didn't make any significant design changes, but I felt that the V in the bodice front showed a little too much cleavage for my taste, so I sewed the facing to the front bodice at a quarter inch seam allowance instead of the standard 5/8", lifting the bottom center 3/8".  That later caused me to have to redo the whole facing application (the curve just wasn't looking very nice), which I had already understitched, and if you've ever ripped any seams sewed in interfaced material, you know what a pain in the neck that was. 

I also substituted the invisible zipper with a lapped regular zipper. I don't have an invisible zipper foot, which is the reason for that choice. I love how the patterns calls for a side zipper instead of the dreaded back ones. I just hate having to ask for help to get dressed! 


As you can see, the dress fits like a glove in the back. That made me a very happy camper. I hate things that bulge and pucker in the curve of my back, but this fit perfectly right off the bat. (After shaving off 2 inches on each side seam).  

I didn't attach the pockets right away, and wore the dress to church this Sunday without them. It looks great without them in this kind of fabric. Since I had already prepared them, though, I decided to go ahead and attach them, but they don't show that much at all, the fabric being so busy and all. But I figure that a mother of 2,5 year old twins can never get enough garments with pockets... 


Wednesday, December 12, 2012

Wiksten Tova number 4


Not that I'm trying to get my money's worth for buying the pattern, but sure... after four Tova Tunics, I have to agree with myself, it was not a bad buy!

I really wish I had a lovely solid colored and textured linen to do this tunic in, but alas... no such thing for sale in my little corner of Africa. So I made yet another one in the lovely combination of white bedsheet from the open-air second-hand market, and the inset and collar with fabrics from Denyse Schmidt Hope Valley Collection.

I am not that happy with the patterns and colors on this combo. But I had to pick colors that my friend I was making it for would like, so I compromised on my own ideas. She really liked it, though, which is all that really matters in the end.  I should have cut the collar so the lines went lengthwise and not horizontally. I do NOT like how that looks all. One thing I am happy with, though, is having added a facing in the same fabric as on the front to the front opening. You can't really see it in this picture here, but I promise, it's there! And it is very visible when worn. It was one thing I really didn't like with the other ones I made (following the instructions to the letter). Since the neck opening falls open from the lack of buttons or closures of any kind, the cream colored backside of the Hope Valley fabric was showing a lot more than I wanted it too.  Here, I have remedied that by just cutting a second pair of those horizontal front pieces and adding them as a facing.

I got a lovely action shot of my pregnant friend Fabi wearing it too, but then forgot to copy in to my computer before hubby sold the iPhone....  so now it's deleted. 


Tuesday, November 20, 2012

My very first self-made pattern!

So my little girl got this whole huge bag of hand-me-downs from some friends when we were in Mexico last spring. And there was this one razorback tunic in there that I just loved to bits and it was the cutest thing ever. But the thing is, toddlers grow. And they tend to grow out of stuff, no matter how cute it is. So!I thought, I really need to make a copy of this in a bigger size. But how does one do that? Well... I did not want to rip the whole thing apart. She can still wear it a few more months. So I laid it down on my table and started folding and tracing to the best of my abilities... and pretty soon I had a pattern! I added a centimeter here and there to make it a little bigger, and then I added the seam allowance before I traced it again on pattern paper and started cutting.


I will not go into the details of all the errors I made in the actual construction of this little tunic. When I think about it now, they are such obvious no-nos that they make me blush just thinking about it... But after some pretty hefty seam ripping and redoing, the result was pretty sweet. The yoke is fully lined, and the lining is slip stitched to the seam in the back, so it looks totally perfect on the inside too. The side seams are French. Oh, yeah, I went all out here.


But I'm far from completely happy. 


My first mistake was the fabric I chose for the yoke. It'ss way too sturdy and has no ... NO... stretch. So even though the tunic is sleeveless and has a 12 centimeter button opening in the front, its hard to get it on and off. Next time, I'll try something more stretchy, like maybe a stretch denim?

Mistake 2: The button holes. Oh. Dear.  I will not show an up close picture of them. I SHOULD have done them in yellow thread, but in my still-newbie innocence thought they would look nice in white, since all the other contrasting was done in white. The yellow would have covered my poor work more... I don't know why they turned out so badly. I've never had that happen before. Maybe it's the toughness (and many layers right here) of the yellow yoke fabric. In the yellow fabric's defense, it was born as a sheet (thrifted), so who can blame it for not being apt for garmenthood...?

The shorts are made from MADE's Kid pant pattern. They are the flat front variety, which I have come to really like. And they sew up in like 20 minutes flat, even with French seams. 

Saturday, November 10, 2012

The World's Softest Undies.


Love! At first sight! Or touch!  I came across this panty pattern in Crafterhours' blog called "Rainbow Undies" and thought... hm! Those look OH-SO-COMFY for my littlies, but really, who has the time to sew underwear?

I, apparently. Because yesterday, after the printer seemed to be working again after some trouble with the USB cable, I went trigger happy with my paypal account and purchased not only this pattern, but also the Juniper pants pattern by Colette Patterns. I turns out that after the picture of these undies had been marinating in my mind for a few days, the will to sit down and sew a tiny little garment like underpants was strong enough that I went for it. And I have no regrets. None.

First, I just cut up a tank top of mine that had fallen out of favor and made a pair from that. Call it a muslin. Call it whatever. When I pulled those babies up my son's legs and felt the softness of that yoga waist band and the cute way the fabric hugged his little boy butt, I was sold. There is no scratchiness in this underwear. It is just pure. awesome. softness.

So as soon as my  hubby got in and started playing with the kids, I went running back to the sewing machine and made a pair for my little Princess K. Just as awesome.


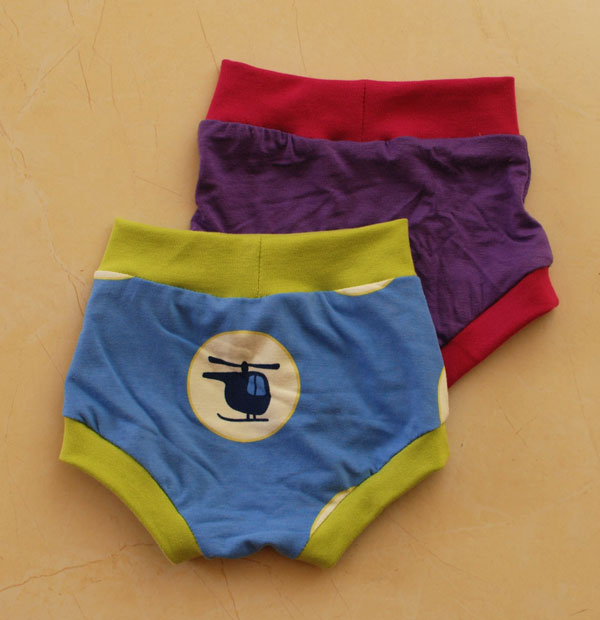
This morning, I cut into some "real" fabric (read: not upcycled, but purchased from the fabric store) and made this cute pair of helicopter undies for Chiquitin, and a purple and pink little number for Princess K. They are wearing them right now. While watching "In the Night Garden" on the iPad and rolling around on the floor, being toddlers.

And they are comfy in their underwear. Yay!!!

So if you have the time (it only takes about 30 minutes, cutting included, and using a conventional machine) to sew some super soft undies for your kid... make a run for it over to Kitchy Coo and get your pattern! The body of the pants have only one piece, so there is no crotch seam, just the two side seams. Soft goodness. (No, I didn't get anything in return for shamelessly promoting somebody's pattern. I just thought it was worth saying something good about it, so I did.)


**Disclaimer 1: I do not have power to use a steam (or dry) iron when our generator is not on, so if you think the undies look wrinkled, it's because they are. They have never been pressed. It is what it is. Sewing in West Africa is not like sewing other places.

**Disclaimer 2: If you thought the helicopter on the front of the undies is upside down, you were right. This is what happens with directional prints when there's only one pattern piece. The print is going to be upside down either in the front of back. I chose front. It seems my kid is running away from me more than towards me, so I prioritized making the butt side look right. As an added bonus, he will see the helicopter the right way when looking down on his underwear. See? It's all thought through!

Linking up with Tatertots and Jello Weekend Wrap Up Party.  

and

Tuesday, October 30, 2012

Self-drafted: A-line skirt

I participated in my very first sew-along this month! It was organised by a member of a sewing forum I frequent (in my native Norwegian) called Sykroken.net


The purpose of the sew-along was to construct our own patterns for an A-line skirt (starting with a basic skirt block based on our own measurements) and then sew a skirt from the pattern.

I really enjoyed the process, and learned a lot!


I  started out making a muslin, but then I decided to add a zipper to it, so I could practice installing a lapped zipper, which I'd never done before. After doing all that work, it felt so wrong to rip apart the skirt to adjust the pattern, so at first I didn't. That was a big mistake! After cutting and basting my "real" skirt from a really blingy Wax print, I realised it was way too big, and I had to go back to the muslin, cut it apart at the seams, and redo the pattern by cutting off a lot of excess in the side seams.


I added a center back zipper (lapped)


and side pockets in a coordinating teal cotton fabric. I also added a simple waistband after lowering the waist about 6 cms


In the picture on top, I am showing the skirt with my daughter, who is wearing a dress I sewed for her about a year ago.