Wednesday, December 12, 2012
Wiksten Tova number 4
Not that I'm trying to get my money's worth for buying the pattern, but sure... after four Tova Tunics, I have to agree with myself, it was not a bad buy!
I really wish I had a lovely solid colored and textured linen to do this tunic in, but alas... no such thing for sale in my little corner of Africa. So I made yet another one in the lovely combination of white bedsheet from the open-air second-hand market, and the inset and collar with fabrics from Denyse Schmidt Hope Valley Collection.
I am not that happy with the patterns and colors on this combo. But I had to pick colors that my friend I was making it for would like, so I compromised on my own ideas. She really liked it, though, which is all that really matters in the end. I should have cut the collar so the lines went lengthwise and not horizontally. I do NOT like how that looks all. One thing I am happy with, though, is having added a facing in the same fabric as on the front to the front opening. You can't really see it in this picture here, but I promise, it's there! And it is very visible when worn. It was one thing I really didn't like with the other ones I made (following the instructions to the letter). Since the neck opening falls open from the lack of buttons or closures of any kind, the cream colored backside of the Hope Valley fabric was showing a lot more than I wanted it too. Here, I have remedied that by just cutting a second pair of those horizontal front pieces and adding them as a facing.
I got a lovely action shot of my pregnant friend Fabi wearing it too, but then forgot to copy in to my computer before hubby sold the iPhone.... so now it's deleted.
Tuesday, November 20, 2012
My very first self-made pattern!
So my little girl got this whole huge bag of hand-me-downs from some friends when we were in Mexico last spring. And there was this one razorback tunic in there that I just loved to bits and it was the cutest thing ever. But the thing is, toddlers grow. And they tend to grow out of stuff, no matter how cute it is. So!I thought, I really need to make a copy of this in a bigger size. But how does one do that? Well... I did not want to rip the whole thing apart. She can still wear it a few more months. So I laid it down on my table and started folding and tracing to the best of my abilities... and pretty soon I had a pattern! I added a centimeter here and there to make it a little bigger, and then I added the seam allowance before I traced it again on pattern paper and started cutting.

I will not go into the details of all the errors I made in the actual construction of this little tunic. When I think about it now, they are such obvious no-nos that they make me blush just thinking about it... But after some pretty hefty seam ripping and redoing, the result was pretty sweet. The yoke is fully lined, and the lining is slip stitched to the seam in the back, so it looks totally perfect on the inside too. The side seams are French. Oh, yeah, I went all out here.
But I'm far from completely happy.
My first mistake was the fabric I chose for the yoke. It'ss way too sturdy and has no ... NO... stretch. So even though the tunic is sleeveless and has a 12 centimeter button opening in the front, its hard to get it on and off. Next time, I'll try something more stretchy, like maybe a stretch denim?
Mistake 2: The button holes. Oh. Dear. I will not show an up close picture of them. I SHOULD have done them in yellow thread, but in my still-newbie innocence thought they would look nice in white, since all the other contrasting was done in white. The yellow would have covered my poor work more... I don't know why they turned out so badly. I've never had that happen before. Maybe it's the toughness (and many layers right here) of the yellow yoke fabric. In the yellow fabric's defense, it was born as a sheet (thrifted), so who can blame it for not being apt for garmenthood...?
The shorts are made from MADE's Kid pant pattern. They are the flat front variety, which I have come to really like. And they sew up in like 20 minutes flat, even with French seams.

I will not go into the details of all the errors I made in the actual construction of this little tunic. When I think about it now, they are such obvious no-nos that they make me blush just thinking about it... But after some pretty hefty seam ripping and redoing, the result was pretty sweet. The yoke is fully lined, and the lining is slip stitched to the seam in the back, so it looks totally perfect on the inside too. The side seams are French. Oh, yeah, I went all out here.

My first mistake was the fabric I chose for the yoke. It'ss way too sturdy and has no ... NO... stretch. So even though the tunic is sleeveless and has a 12 centimeter button opening in the front, its hard to get it on and off. Next time, I'll try something more stretchy, like maybe a stretch denim?
Mistake 2: The button holes. Oh. Dear. I will not show an up close picture of them. I SHOULD have done them in yellow thread, but in my still-newbie innocence thought they would look nice in white, since all the other contrasting was done in white. The yellow would have covered my poor work more... I don't know why they turned out so badly. I've never had that happen before. Maybe it's the toughness (and many layers right here) of the yellow yoke fabric. In the yellow fabric's defense, it was born as a sheet (thrifted), so who can blame it for not being apt for garmenthood...?
The shorts are made from MADE's Kid pant pattern. They are the flat front variety, which I have come to really like. And they sew up in like 20 minutes flat, even with French seams.
Saturday, November 10, 2012
The World's Softest Undies.
Love! At first sight! Or touch! I came across this panty pattern in Crafterhours' blog called "Rainbow Undies" and thought... hm! Those look OH-SO-COMFY for my littlies, but really, who has the time to sew underwear?
I, apparently. Because yesterday, after the printer seemed to be working again after some trouble with the USB cable, I went trigger happy with my paypal account and purchased not only this pattern, but also the Juniper pants pattern by Colette Patterns. I turns out that after the picture of these undies had been marinating in my mind for a few days, the will to sit down and sew a tiny little garment like underpants was strong enough that I went for it. And I have no regrets. None.
First, I just cut up a tank top of mine that had fallen out of favor and made a pair from that. Call it a muslin. Call it whatever. When I pulled those babies up my son's legs and felt the softness of that yoga waist band and the cute way the fabric hugged his little boy butt, I was sold. There is no scratchiness in this underwear. It is just pure. awesome. softness.
So as soon as my hubby got in and started playing with the kids, I went running back to the sewing machine and made a pair for my little Princess K. Just as awesome.
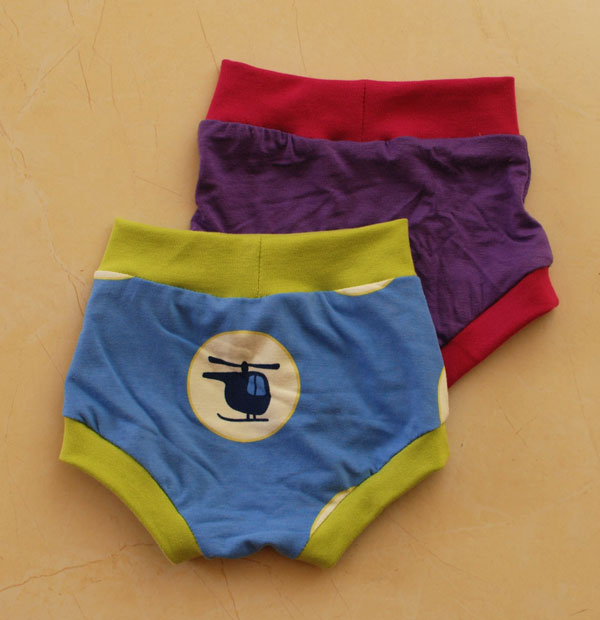
This morning, I cut into some "real" fabric (read: not upcycled, but purchased from the fabric store) and made this cute pair of helicopter undies for Chiquitin, and a purple and pink little number for Princess K. They are wearing them right now. While watching "In the Night Garden" on the iPad and rolling around on the floor, being toddlers.
And they are comfy in their underwear. Yay!!!
So if you have the time (it only takes about 30 minutes, cutting included, and using a conventional machine) to sew some super soft undies for your kid... make a run for it over to Kitchy Coo and get your pattern! The body of the pants have only one piece, so there is no crotch seam, just the two side seams. Soft goodness. (No, I didn't get anything in return for shamelessly promoting somebody's pattern. I just thought it was worth saying something good about it, so I did.)
**Disclaimer 1: I do not have power to use a steam (or dry) iron when our generator is not on, so if you think the undies look wrinkled, it's because they are. They have never been pressed. It is what it is. Sewing in West Africa is not like sewing other places.
**Disclaimer 2: If you thought the helicopter on the front of the undies is upside down, you were right. This is what happens with directional prints when there's only one pattern piece. The print is going to be upside down either in the front of back. I chose front. It seems my kid is running away from me more than towards me, so I prioritized making the butt side look right. As an added bonus, he will see the helicopter the right way when looking down on his underwear. See? It's all thought through!
Linking up with Tatertots and Jello Weekend Wrap Up Party.
and

Tuesday, October 30, 2012
Self-drafted: A-line skirt
I participated in my very first sew-along this month! It was organised by a member of a sewing forum I frequent (in my native Norwegian) called Sykroken.net
The purpose of the sew-along was to construct our own patterns for an A-line skirt (starting with a basic skirt block based on our own measurements) and then sew a skirt from the pattern.
I really enjoyed the process, and learned a lot!
I started out making a muslin, but then I decided to add a zipper to it, so I could practice installing a lapped zipper, which I'd never done before. After doing all that work, it felt so wrong to rip apart the skirt to adjust the pattern, so at first I didn't. That was a big mistake! After cutting and basting my "real" skirt from a really blingy Wax print, I realised it was way too big, and I had to go back to the muslin, cut it apart at the seams, and redo the pattern by cutting off a lot of excess in the side seams.
I added a center back zipper (lapped)
and side pockets in a coordinating teal cotton fabric. I also added a simple waistband after lowering the waist about 6 cms
In the picture on top, I am showing the skirt with my daughter, who is wearing a dress I sewed for her about a year ago.
Wednesday, October 24, 2012
Yet another adventure in the art of shopping in the dusty streets of a West African town
This afternoon I took my bike downtown to the market to see if I could find some string. I was a woman on a mission. I needed some sort of string that I could use to stuff my bias tape with to make piping. I didn't feel like risking all my needles by sewing across the metal center of the clothes line I used last time.
But alas, it was not easy. I went to several little shops, and all they had was this rough, thin rope used for clothes lines and what not. I looked and looked, but started to feel a little discouraged. So I asked myself: What can I use that looks like string, but is probably something else. Then I had a light bulb moment. Shoe laces! That's it! The round kind of shoe laces would be perfect to make piping with. It's not too rough, its pliable, and it does not have metal in the middle. Perfect!
So I found a shoe shop with lots of shoe laces hanging from rusty nails up in the roof, and bought me four pairs of shoe laces. At 400 CFA a pair(almost a dollar) , it felt like I was being taken advantage off, but Tabaski (Islamic holiday) is only two days away, and everything is more expensive in the days right before it. All the shop keepers want some extra cash for the holiday, I guess.
Now I'm happy, I have the supplies to make piping for more Toddler backpacks!
Monday, October 15, 2012
Toddler backpack
After I suddenly found out my friend's daughter was turning two last week, I finally had a great excuse to purchase Rae Hoekstra's awesome toddler backpack pattern. I mean... I'm sure there are backpack patterns to be found for free all over the sewing blogosphere, but why get free milk when you can buy a whole cow? Ahem..
(please excuse the crappy iPod pictures.... I finished hand stitching the lining to the inside of the pack in the car on our way there, so I didn't have time to take any pictures with my nice camera first. And I totally forgot to take a picture of the awesome lining and inside pocket!)
Anyway... I'm a sucker for things that are already thought out that I
don't have to measure and guesstimate, so this pattern was a find.
Where we live, there is no Toys-R-Us or anything even remotely similar. The only toys available for sale are crazy expensive, crappy "made in fill-in-the-blank" things that last my toddlers an average of 1/4 day before loosing pieces and parts that really matter, such as the wings on planes, wheels on cars and so on. SO.... whenever I can, I try to make presents instead of supporting the crappy-toys industry.
Here's my daughter modelling the backpack. Gotta love how much it makes her look like a "big girl"!
So I made this backpack for little Savannah. The pattern calls for about two yards of piping, and Ay! There's the rub. Because where do you get piping in Guinea-Bissau? Answer? No, I haven't found any yet. But I did find a string formerly used to tie a mosquito net in place, and it seemed the appropriate thickness to make some piping. Trouble was, it was only about a yard long. So once I'd finished making the first yard, I had to go looking for more string. And found none. Then it ocurred to me that my clothes line (with metal wire inside) is about the same thickness, so there I went, cutting down a yard of clothes line to make more piping. When sewing the piping to the fabric I had to watch carefully not to sew into the metal wire and break the needle. Ah, the adventures of living off the JoAnn grid!
Linking up to "What I wore Sunday"
(please excuse the crappy iPod pictures.... I finished hand stitching the lining to the inside of the pack in the car on our way there, so I didn't have time to take any pictures with my nice camera first. And I totally forgot to take a picture of the awesome lining and inside pocket!)
Where we live, there is no Toys-R-Us or anything even remotely similar. The only toys available for sale are crazy expensive, crappy "made in fill-in-the-blank" things that last my toddlers an average of 1/4 day before loosing pieces and parts that really matter, such as the wings on planes, wheels on cars and so on. SO.... whenever I can, I try to make presents instead of supporting the crappy-toys industry.
Here's my daughter modelling the backpack. Gotta love how much it makes her look like a "big girl"!
So I made this backpack for little Savannah. The pattern calls for about two yards of piping, and Ay! There's the rub. Because where do you get piping in Guinea-Bissau? Answer? No, I haven't found any yet. But I did find a string formerly used to tie a mosquito net in place, and it seemed the appropriate thickness to make some piping. Trouble was, it was only about a yard long. So once I'd finished making the first yard, I had to go looking for more string. And found none. Then it ocurred to me that my clothes line (with metal wire inside) is about the same thickness, so there I went, cutting down a yard of clothes line to make more piping. When sewing the piping to the fabric I had to watch carefully not to sew into the metal wire and break the needle. Ah, the adventures of living off the JoAnn grid!
Linking up to "What I wore Sunday"

Thursday, October 4, 2012
Finished: Self-drafted Toddler PJs
I found this ugly green top at the thrift market almost a year ago, thinking "gee, that fabric looks cute, but the top is hideous". So I negotiated the price and brought the thing home, and there it sat, for a long time. It was an adult size top, quite a wide one at that, so there was plenty of material to cut from to make a size 2T pyjama.
Inspiration only struck this week, though, I had been eying some hand-me-down pj pants of my daughter's that looked darn cute but a little, well, tired. So I traced a pj bottom that fits her to make a pattern, and sewed up a cute little PJ pant for her. Then I remembered this image I'd seen of one of the Oliver & S patterns. It was a crossover front top, (while quite different from what I made) and I thought it would make a cute coordinating top for the PJ bottoms. So I found some tracing paper and a ruler and played around a little with a tank top pattern I made earlier, and came up with this.
Here's Princess K and her brother having fun with some pre-bed-time train track engineering.
These PJs were featured by Crafty Cousins! In the very first linky party I attended. How cool is that?

Subscribe to:
Posts (Atom)